Hono + Obsidianプラグインをハンズオン形式で開発してみる
Honoを使用してObsidianプラグインを開発するための環境構築手順を解説します。pnpm workspacesを使ったモノレポ構成でCloudflare Workers上で動作するHonoとObsidianプラグインを管理します。
目次
はじめに
この記事では、Honoを使用して Obsidian プラグインを開発するための環境構築手順を解説します。
Obsidian プラグインと、Hono(Cloudflare Workers 上で動作)を、pnpm workspaces を使ったモノレポ構成で管理します。
動作イメージ
Obsidian プラグインから Cloudflare Workers 上で動作する Hono にリクエストを送り、Hono が処理してレスポンスを返す、という流れを実現します。
プロジェクトのセットアップ
それでは、プロジェクトの骨組みを作っていきましょう。
リポジトリの準備
まず、GitHub で新しいリポジトリを作成します(例:obsidian-hono-plugin-example)。
作成したら、ローカルにクローンします。
git clone <your-repository-url>
cd obsidian-hono-plugin-examplepnpm workspace の初期設定
pnpm workspace を初期化します。
プロジェクトのルートに pnpm-workspace.yaml を作成し、パッケージの配置場所を指定します。
## pnpm-workspace.yaml
packages:
- 'packages/*'プロジェクトルートに package.json を作成し、基本情報を設定します。
{
  "name": "obsidian-hono-plugin-example-monorepo",
  "private": true,
  "version": "0.0.1",
  "description": "Monorepo for Obsidian plugin with Hono backend",
  "scripts": {
    "dev:plugin": "pnpm --filter obsidian-plugin dev",
    "build:plugin": "pnpm --filter obsidian-plugin build",
    "dev:worker": "pnpm --filter cloudflare-worker dev",
    "deploy:worker": "pnpm --filter cloudflare-worker deploy",
    "build": "pnpm build:plugin && pnpm --filter cloudflare-worker build"
  },
  "packageManager": "pnpm@10.2.1",
}ディレクトリ構成の作成
プロジェクトルートに packages ディレクトリを作成
mkdir packagesCloudflare Workers (Hono) 側のセットアップ
次は、API の構築です。Hono フレームワークを使って、Obsidian プラグインのための API を作成します。
cloudflare-worker パッケージの初期化
packages ディレクトリに移動して、Hono をセットアップしていきましょう。
$ pnpm create hono@latest
create-hono version 0.18.0
✔ Target directory cloudflare-worker
✔ Which template do you want to use? cloudflare-workers
✔ Do you want to install project dependencies? Yes
✔ Which package manager do you want to use? pnpm
✔ Cloning the template
✔ Installing project dependencies
🎉 Copied project files
Get started with: cd cloudflare-worker作成された package.json を以下のように修正します。
{
  "name": "cloudflare-worker",
  "scripts": {
    "build": "esbuild src/index.ts --bundle --format=esm --outfile=dist/index.js --platform=browser",
    "dev": "pnpm build && wrangler dev",
    "deploy": "pnpm build && wrangler deploy --minify",
    "cf-typegen": "wrangler types --env-interface CloudflareBindings"
  },
  "dependencies": {
    "hono": "^4.7.9"
  },
  "devDependencies": {
    "@cloudflare/workers-types": "^4.20250509.0",
    "esbuild": "^0.25.4",
    "wrangler": "^4.4.0"
  }
}依存関係をインストールします。
pnpm installwrangler.jsonc の修正
初期設定でムダなものが多いので、wrangler.jsonc ファイルを以下のように設定します。
{
  "$schema": "node_modules/wrangler/config-schema.json",
  "name": "obsidian-hono-api",
  "main": "src/index.ts",
  "compatibility_date": "2025-05-09",
  "compatibility_flags": ["nodejs_compat"]
}その後以下のコマンドを実行し、開発サーバーを起動します。
pnpm devブラウザや curl で http://localhost:8787/ にアクセスしレスポンスが返ってくれば成功です!
Cloudflare KV との連携
Cloudflare KV は、Cloudflare Workers から利用できるキーバリューストアです。プラグインの設定やデータを保存するのに使用します。
Cloudflare ダッシュボードで KV Namespace を作成します。
- Cloudflare にログインし、アカウントを選択
- 左側のメニューから
Workers & Pages>KVを選択 Create a namespaceボタンをクリックし、名前(例:OBSIDIAN_PLUGIN_STORE)を入力して作成
wrangler.jsonc に KV Namespace の情報を追加します。
作成した KV Namespace の ID をコピーし、以下のように設定します。
{
  "$schema": "node_modules/wrangler/config-schema.json",
  "name": "obsidian-hono-api",
  "main": "src/index.ts",
  "compatibility_date": "2025-05-09",
  "compatibility_flags": ["nodejs_compat"],
  "kv_namespaces": [
    {
      "binding": "OBSIDIAN_PLUGIN_STORE",
      "id": "fd0480ababdc4ba29e161c63f721c686"
    }
  ]
}binding の名前 (OBSIDIAN_PLUGIN_STORE) は、Worker スクリプト内でこの KV Namespace を参照する時の変数名になります。
今回は省略しますが、本番環境と開発環境で異なる KV Namespace を使用することを推奨します。
HonoでのKV操作
packages/cloudflare-worker/src/index.ts を編集して、KV を操作するエンドポイントを追加します。
import { Hono } from 'hono';
type Bindings = {
OBSIDIAN_PLUGIN_STORE: KVNamespace;
};
const app = new Hono<{ Bindings: Bindings }>();
app.use('*', async (c, next) => {
try {
await next();
} catch (error) {
console.error('Unexpected error:', error);
return c.json(
{
error: 'Internal server error',
message: error instanceof Error ? error.message : 'Unknown error',
},
500,
);
}
});
app.get('/', (c) => {
return c.text('Hello Hono on Cloudflare Workers!');
});
// KVからデータを取得するエンドポイント
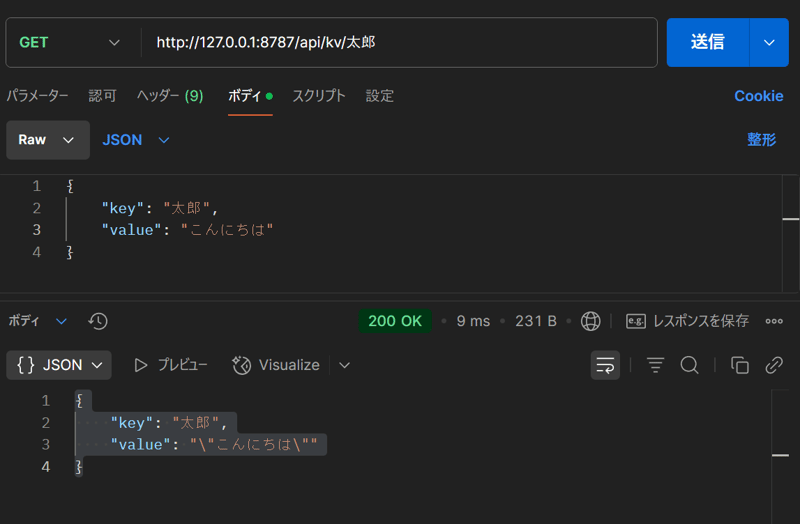
app.get('/api/kv/:key', async (c) => {
const key = c.req.param('key');
if (!key) {
return c.json({ error: 'Key is required' }, 400);
}
try {
const value = await c.env.OBSIDIAN_PLUGIN_STORE.get(key);
if (value === null) {
return c.json({ error: 'Key not found' }, 404);
}
return c.json({ key, value });
} catch (error) {
console.error('KV GET Error:', error);
return c.json({ error: 'Failed to get value from KV' }, 500);
}
});
// KVにデータを保存/更新するエンドポイント
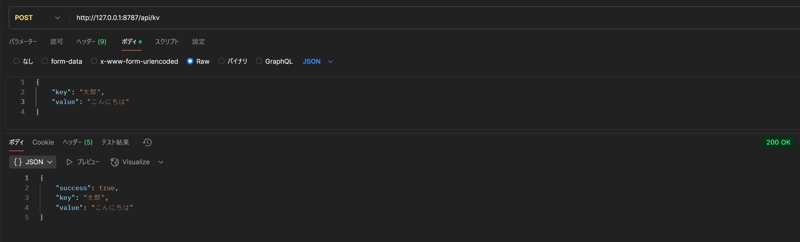
app.post('/api/kv', async (c) => {
const { key, value } = await c.req.json<{ key: string; value: string }>();
if (!key || !value) {
return c.json({ error: 'Key or value is required' }, 400);
}
try {
await c.env.OBSIDIAN_PLUGIN_STORE.put(key, JSON.stringify(value));
return c.json({ success: true, key, value });
} catch (error) {
console.error('KV POST Error:', error);
return c.json({ error: 'Failed to put value to KV' }, 500);
}
});
export default app;試しに POSTMAN とかで POST・GET リクエストを送ってみると、正常に動いていることが確認できますね。
Obsidianプラグイン側のセットアップ
packages/obsidian-plugin ディレクトリに移動したあと、package.json を作成します。
{
  "name": "obsidian-plugin",
  "version": "1.0.0",
  "private": true,
  "main": "main.js",
  "scripts": {
    "dev": "node esbuild.config.mjs",
    "build": "tsc -noEmit -skipLibCheck && node esbuild.config.mjs production"
  },
  "devDependencies": {
    "@types/node": "^22.15.17",
    "builtin-modules": "^5.0.0",
    "dotenv": "^16.5.0",
    "esbuild": "^0.25.4",
    "obsidian": "^1.8.7",
    "tslib": "^2.8.1",
    "typescript": "^5.8.3"
  }
}追加で必要な依存関係をインストールします。
pnpm installmanifest.json の作成
同じく packages/obsidian-plugin ディレクトリに、Obsidian プラグインの定義ファイルである manifest.json を作成します。
プラグインの ID とか名前とか、そういう情報を書くファイルです。
{
  "id": "obsidian-hono-plugin",
  "name": "Obsidian Hono Plugin Example",
  "version": "0.1.0",
  "minAppVersion": "1.5.0",
  "description": "An example Obsidian plugin that interacts with a Hono backend.",
  "author": "sui",
  "authorUrl": "",
  "isDesktopOnly": false
}ビルド設定
esbuild 用の設定ファイル esbuild.config.mjs を作成します。
ビルド後の dist フォルダーにはビルド後の main.js と manifest.json が格納されます。
import esbuild from 'esbuild';
import process from 'process';
import builtins from 'builtin-modules';
import dotenv from 'dotenv';
import fs from 'node:fs';
import path from 'node:path';

dotenv.config();

const banner = `/*
THIS IS A GENERATED/BUNDLED FILE BY ESBUILD
if you want to view the source, please visit the github repository of this plugin
*/
`;

const prod = process.argv[2] === 'production';

const outdir = './dist';
const outfile = path.join(outdir, 'main.js');

const copyManifestPlugin = {
  name: 'copy-manifest',
  setup(build) {
    build.onEnd(async (result) => {
      if (result.errors.length > 0) {
        console.log('Build failed, not copying manifest.json');
        return;
      }
      const sourceManifest = 'manifest.json';
      const destManifest = path.join(outdir, 'manifest.json');
      try {
        await fs.promises.mkdir(outdir, { recursive: true });
        await fs.promises.copyFile(sourceManifest, destManifest);
        console.log(`Copied ${sourceManifest} to ${destManifest}`);
      } catch (err) {
        console.error(`Error copying manifest.json: ${err}`);
      }
    });
  },
};

const context = await esbuild.context({
  banner: {
    js: banner,
  },
  entryPoints: ['src/main.ts'],
  bundle: true,
  define: {
    'process.env.OBSIDIAN_API_URL': JSON.stringify(
      process.env.OBSIDIAN_API_URL,
    ),
  },
  external: [
    'obsidian',
    'electron',
    '@codemirror/autocomplete',
    '@codemirror/collab',
    '@codemirror/commands',
    '@codemirror/language',
    '@codemirror/lint',
    '@codemirror/search',
    '@codemirror/state',
    '@codemirror/view',
    '@lezer/common',
    '@lezer/highlight',
    '@lezer/lr',
    ...builtins,
  ],
  format: 'cjs',
  target: 'es2018',
  logLevel: 'info',
  sourcemap: prod ? false : 'inline',
  treeShaking: true,
  outfile: outfile,
  platform: 'node',
  plugins: [copyManifestPlugin],
});

if (prod) {
  await context.rebuild();
  process.exit(0);
} else {
  await context.watch();
}いくつか esbuild の復習をします。
external オプションは、esbuild に対して、ここに列挙されたモジュールをバンドル(1 つのファイルにまとめること)の対象外とするよう指示します。
'obsidian', 'electron'
これらは Obsidian アプリケーション本体が提供するモジュールです。
プラグインは Obsidian の環境内で実行されるため、これらのモジュールはすでに利用可能な状態にあります。
バンドルに含めてしまうと、ファイルサイズが不必要に大きくなるだけでなく、Obsidian 本体の機能と重複・衝突する可能性があります。
そのため、外部扱いとして、実行時に Obsidian が提供するものを使用するようにします。
'@codemirror/...', '@lezer/...'
これらは Obsidian がエディター機能のために内部で使用しているライブラリです。Obsidian 本体と同様の理由で、外部扱いとすることが推奨されます。
...builtins
これは Node.js の組み込みモジュール(例: fs, path など)を指します。
Obsidian プラグインは Node.js の実行環境に近い形で動作するため、これらの組み込みモジュールも直接利用できます。バンドルに含める必要はありません。
このように external を設定することで、以下のメリットがあります。
- バンドルサイズの削減: プラグインの
main.jsファイルが小さくなり、配布や読み込みが高速になります。 - Obsidian環境との整合性: Obsidian 本体や他のプラグインと機能を共有しやすくなり、競合のリスクを低減します。
- ビルド時間の短縮: バンドル対象のファイルが減るため、ビルド時間が短縮されることがあります。
external オプションは、プラグインが必要とする機能のうち、Obsidian 環境がすでに提供しているものや、Node.js の標準機能については、それらを再利用するように esbuild に指示するための重要な設定です。
プラグインの実装
src ディレクトリを作成し、その中に main.ts を作成します。
import {
App,
Notice,
Plugin,
PluginSettingTab,
Setting,
requestUrl,
Modal,
} from 'obsidian';
import { API_PATHS, DEFAULT_BASE_URL } from './constants';
// プラグイン設定のインターフェース
interface MyPluginSettings {
honoApiBaseUrl: string;
}
// デフォルト設定
const DEFAULT_SETTINGS: MyPluginSettings = {
honoApiBaseUrl: DEFAULT_BASE_URL,
};
export default class MyHonoPlugin extends Plugin {
settings: MyPluginSettings;
async onload() {
await this.loadSettings();
// リボンアイコンを追加
const ribbonIconEl = this.addRibbonIcon(
'cloud',
'Call Hono',
async (_evt: MouseEvent) => {
new Notice('Calling Hono...');
try {
const response = await requestUrl({
url: this.settings.honoApiBaseUrl,
});
if (response.status !== 200) {
new Notice(`API Error: ${response.status} - ${response.text}`);
console.error(`API Error:${response}`);
}
const data = response.text;
new Notice(`API Response: ${data}`);
} catch (error) {
new Notice('Failed to call Hono. Check console.');
console.error('Failed to call Hono:', error);
}
},
);
ribbonIconEl.addClass('my-hono-plugin-ribbon-class');
// 設定タブを追加
this.addSettingTab(new MyPluginSettingTab(this.app, this));
// KVに値を設定するコマンド
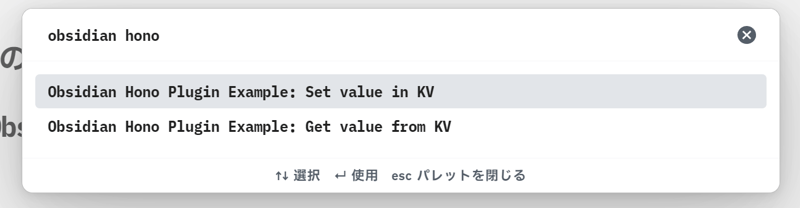
this.addCommand({
id: 'set-kv-value',
name: 'Set value in KV',
callback: async () => {
new InputModal(this.app, 'Set KV Value', async (inputs) => {
const { key, value } = inputs;
if (!key || value === undefined) {
new Notice('Both key and value are required.');
return;
}
new Notice(`Setting KV: key=${key}, value=${value}`);
try {
const response = await requestUrl({
url: `${this.settings.honoApiBaseUrl}${API_PATHS.KV}`,
method: 'POST',
headers: { 'Content-Type': 'application/json' },
body: JSON.stringify({ key: key, value: value }),
});
if (response.status !== 200) {
new Notice(`KV Set Error: ${response.status} - ${response.text}`);
}
new Notice(`Successfully set ${key} in KV.`);
} catch (e) {
new Notice('Failed to set KV value. Check console.');
console.error(e);
}
}).open();
},
});
// KVから値を取得するコマンド
this.addCommand({
id: 'get-kv-value',
name: 'Get value from KV',
callback: async () => {
new InputModal(
this.app,
'Get KV Value',
async (inputs) => {
const { key } = inputs;
if (!key) {
new Notice('Key is required.');
return;
}
new Notice(`Getting KV: key=${key}`);
try {
const response = await requestUrl({
url: `${this.settings.honoApiBaseUrl}${API_PATHS.KV}/${encodeURIComponent(key)}`,
method: 'GET',
});
if (response.status !== 200) {
new Notice(
`KV Get Error: ${response.status} - ${response.text}`,
);
return;
}
const data = response.json as { key: string; value: string };
new Notice(`KV Get: key=${data.key}, value=${data.value}`);
console.log(`KV Data:${JSON.stringify(data)}`);
} catch (e) {
new Notice('Failed to get KV value. Check console.');
console.error(e);
}
},
false,
).open();
},
});
console.log('MyHonoPlugin loaded with KV commands.');
}
onunload() {
console.log('MyHonoPlugin unloaded.');
}
async loadSettings() {
this.settings = Object.assign({}, DEFAULT_SETTINGS, await this.loadData()); //settingsオブジェクトをロード
}
async saveSettings() {
await this.saveData(this.settings); //settingsオブジェクトをセーブ
}
}
class MyPluginSettingTab extends PluginSettingTab {
plugin: MyHonoPlugin;
constructor(app: App, plugin: MyHonoPlugin) {
super(app, plugin);
this.plugin = plugin;
}
display(): void {
const { containerEl } = this;
containerEl.empty();
containerEl.createEl('h2', { text: 'Hono Plugin Settings' });
new Setting(containerEl)
.setName('Hono Base URL') //設定名
.setDesc('The base URL for the Hono backend API.')
.addText((text) =>
text
.setPlaceholder('e.g., http://localhost:8787')
.setValue(this.plugin.settings.honoApiBaseUrl) //settingsから値を取得
.onChange(async (value) => {
this.plugin.settings.honoApiBaseUrl = value.trim(); //settingsに値を保存
await this.plugin.saveSettings();
}),
);
}
}
class InputModal extends Modal {
inputs: { key: string; value?: string };
onSubmit: (inputs: { key: string; value?: string }) => Promise<void>;
showValueField: boolean;
title: string;
constructor(
app: App,
title: string,
onSubmit: (inputs: { key: string; value?: string }) => Promise<void>,
showValueField = true,
) {
super(app);
this.title = title;
this.onSubmit = onSubmit;
this.inputs = { key: '' };
if (showValueField) {
this.inputs.value = '';
}
this.showValueField = showValueField;
}
onOpen() {
const { contentEl } = this;
contentEl.empty();
contentEl.createEl('h2', { text: this.title });
new Setting(contentEl).setName('Key').addText((text) =>
text.onChange((value) => {
this.inputs.key = value;
}),
);
if (this.showValueField) {
new Setting(contentEl)
.setName('Value (JSON stringifiable)')
.addText((text) =>
text.onChange((value) => {
this.inputs.value = value;
}),
);
}
new Setting(contentEl).addButton((btn) =>
btn
.setButtonText('Submit')
.setCta()
.onClick(async () => {
await this.onSubmit(this.inputs);
this.close();
}),
);
}
onClose() {
const { contentEl } = this;
contentEl.empty();
}
}主要なクラスとメソッドの役割を見ていきましょう。
MyHonoPlugin extends Plugin: プラグインのメインクラスです。Obsidian の Plugin クラスを継承し、プラグインのライフサイクル(ロード、アンロード)や機能を提供します。
async onload(): プラグインが有効化されたときに Obsidian によって呼び出されます。ここで行う主な処理は以下の通りです。await this.loadSettings(): 保存されているプラグイン設定を読み込みます。this.addRibbonIcon(...): Obsidian の左側のリボンエリアにアイコンを追加し、クリック時のアクションを定義します。この例では、Hono のルートエンドポイントにリクエストを送信し、レスポンスを通知で表示します。this.addSettingTab(...): プラグイン専用の設定画面を Obsidian の設定メニューに追加します。this.addCommand(...): Obsidian のコマンドパレットから実行できるカスタムコマンドを追加します。この例では、Hono を通じて Cloudflare KV に値を設定するコマンドと、値を取得するコマンドを登録しています。コマンド実行時には、InputModalクラスを使ってユーザーにキーや値を入力させています。
onunload(): プラグインが無効化されたときに呼び出されます。onloadで登録したイベントリスナーの解除など、後片付け処理を記述します。async loadSettings()/async saveSettings(): プラグインの設定データを Obsidian のストレージに読み書きするためのメソッドです。今回の例では API のエンドポイントをthis.loadData()とthis.saveData()という Obsidian 提供の API を利用しています。
MyPluginSettings (インターフェイス): プラグインが保存する設定データの型を定義します。この例では、Hono のベース URL (honoApiBaseUrl) を文字列として保存します。
MyPluginSettingTab extends PluginSettingTab: プラグインの設定画面を構築するためのクラスです。
display(): 設定画面の UI を実際に描画するメソッドです。Settingクラスを使って、設定項目名、説明、入力フィールドなどを配置します。この例では、Hono のベース URL を入力するためのテキストフィールドを設置しています。
InputModal extends Modal: ユーザーにキーや値の入力を促すためのカスタムモーダルウィンドウです。
onOpen(): モーダルが表示される際に呼び出され、モーダル内の UI(タイトル、入力フィールド、送信ボタンなど)を構築します。onSubmit(コールバック): モーダルの送信ボタンが押されたときに実行される処理を定義します。呼び出し元(この場合はコマンドのコールバック)に、入力されたキーと値を渡します。
プラグインのインストール
ビルドした後は実際にプラグインを Obsidian にインストールしていきましょう。
Obsidian の Vault(保管庫)を開きます。
Vault の中に .obsidian/plugins/ ディレクトリがあることを確認します(なければ作成します)。
その中に、プラグイン用のフォルダーを作成します。名前は manifest.json の id と同じにするのが一般的です。ここでは obsidian-hono-plugin という名前にします。
(例: MyVault/.obsidian/plugins/obsidian-hono-plugin/)
今いる packages/obsidian-plugin ディレクトリの中にある main.js と manifest.json をさきほど作成した obsidian-hono-plugin フォルダーにコピーします。
Obsidian をリロード(Windows なら Ctrl + R、Mac なら Cmd + R)するか、一度閉じて再度開きます。
Obsidian の 設定 (左下の歯車アイコン) > コミュニティプラグイン を開いてみてください。
一覧の中に Obsidian Hono Plugin Example (manifest.json で設定した名前) があるはずなので、トグルをオンにして有効化します。
これで、コマンドパレット (Windows なら Ctrl + P、Mac なら Cmd + P) を開いて、たとえば「Get value from KV」と入力すると、さきほど追加したコマンドが出てくるはずです。
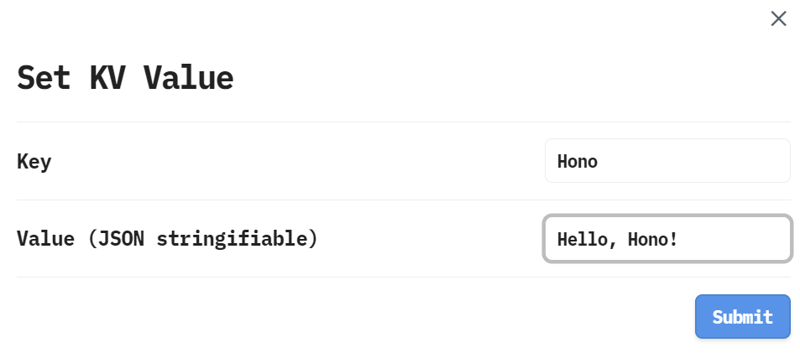
Obsidian 上から実際に KV ストアに値を登録してみましょう。
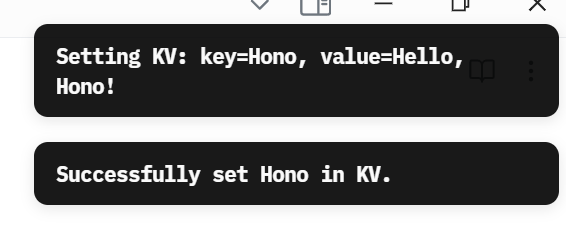
コマンドパレットから Set value in KV via Hono を実行してみてください。キーとバリューを入力するモーダルが出てくるので、適当な値を設定してリクエストを送信します。
すると、ローカルで動いている Hono の開発サーバーに POST リクエストが飛んでいくのがコンソールで確認できます。
Cloudflare Worker 側のコンソールにはこのようなログが表示されているでしょう。
[wrangler:inf] Ready on http://localhost:8787
⎔ Starting local server...
[wrangler:inf] PUT /api/kv/YourKey 200 OK (XXms) 登録した値もちゃんと取り出せるか試してみましょう。
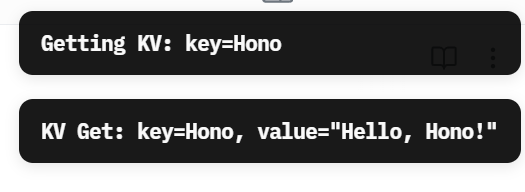
コマンドパレットから Get value from KV via Hono を実行して、さっき登録した キー を入力して送信します。

実行後、画面右上に「KV Get: key=... value=...」みたいに、さっき登録した値が返ってきたら成功です!
デプロイ
ローカルでうまく動くようになったら、本番環境にデプロイしていきましょう。
cloudflare-worker ディレクトリに移動して以下のコマンドを実行します。
pnpm run deployすると、こんな感じのログが出てデプロイが実行されます。
> cloudflare-worker@ deploy /path/to/your/project/packages/cloudflare-worker
> pnpm build && wrangler deploy


> cloudflare-worker@ build /path/to/your/project/packages/cloudflare-worker
> esbuild src/index.ts --bundle --format=esm --outfile=dist/index.js --platform=browser --alias:node:buffer=buffer --alias:node:stream=stream-browserify --alias:node:crypto=crypto-browserify --alias:events=events --alias:stream=stream-browserify


  dist/index.js  XX.Xkb

⚡ Done in XXms

 ⛅️ wrangler 3.x.x (or newer)
-------------------
Total Upload: XX.XX KiB / gzip: XX.XX KiB
Worker Startup Time: X ms
Your Worker has access to the following bindings:
- KV Namespaces:
  - OBSIDIAN_PLUGIN_STORE: xxxxxxxxxxxxxxxxxxxxxxxxxxxxxxxx
Uploaded obsidian-hono-api (X.XX sec)
Deployed obsidian-hono-api triggers (X.XX sec)

https://obsidian-hono-api.your-username.workers.devデプロイが完了したら、Obsidian プラグインの設定画面で「Hono URL」を、ログの最後に出てきた https://obsidian-hono-api.your-username.workers.dev のような URL に変更することを忘れないようにしましょう。
これで本番環境へリクエストを送っても、ちゃんと KV への値が登録されたり、取得できたりするのが確認できるはずです!


まとめ
これで、Hono を API として使った Obsidian プラグイン開発の基本的な環境が整いました。
このハンズオンが、あなたの Obsidian プラグイン開発の第一歩として、少しでもお役に立てたら嬉しいです。
参考資料
GitHub - onikun94/line_to_obsidian
Contribute to onikun94/line_to_obsidian development by creating an account on GitHub.
GitHub - obsidianmd/obsidian-sample-plugin: Template for Obsidian community plugins with build configuration and development best practices.
Template for Obsidian community plugins with build configuration and development best practices. - obsidianmd/obsidian-sample-plugin